This article will guide you to configure Cudy Router step by step.
Common network topology:

Preparations:
1. Unplug your modem and move the backup battery if it has one.
2. Connect router's Internet port (Blue) to the powered-off modem via an Ethernet cable.
3. Power on the modem, and then wait about 2 minutes for it to restart.
4. Connect the power adapter to the router and wait the System LED turn to solid on (red or blue).
5. Connect your computer to the router via Wi-Fi or Ethernet.
6. Check the LEDs to confirm the hardware connection are correct.
Note: Please make sure you can access internet when you connect the computer directly to the modem. If it failed to get the internet, please contact your Internet Service Provider.
Step 1: Open a web browser and go to http://cudy.net or http://192.168.10.1.
For details, please refer to How to log into the web interface of Cudy Router?
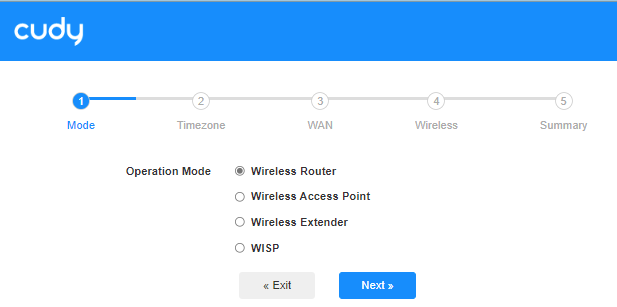
Step 2: The Quick Setup window will pop up, choose 'Wireless Router', then go 'Next'.
Step 3: Choose your 'Time Zone'.

Step 4: Here, we select 'DHCP' as the WAN Internet connection type. The system will auto detect the Internet connect type, you may have a try, but if it failed or not DHCP, please confirm the configuration details with your Internet Service Provider.

Or go to 'General Settings"->'WAN Mode', choose 'DHCP' as Internet connection type, then apply the settings.

 Step 5: Change the wireless network name and password or just keep them default.

 Step 6: Click 'Save & Apply' to complete the configuration.

 Step 7: Wait a few seconds, if it shows 'Connected' in 'System Status' page, then the internet is successfully setup.

89 comments
@Estimado Радик Минханифович Батршин,
puede intentar restablecer el router a los ajustes de fábrica manteniendo pulsado el botón de reinicio durante unos 3 segundos. Suelte el botón de reinicio cuando el LED parpadee. A continuación, vuelva a instalar el router.
“Не правильный вел логин и пароль интернета что теперь делать”
Не правильный вел логин и пароль интернета что теперь делать
@Drogi Piotrze,
Czy masz na myśli, że chcesz połączyć Sun 2000 z Wi-Fi LT700, ale nie możesz znaleźć sygnału? Jeśli tak, to co z innymi urządzeniami? Takimi jak telefony, komputery?
Możesz spróbować zmienić kanał 2,4 GHz i rodzaj szyfrowania w LT700. Następnie sprawdź ponownie.
“Dzień dobry jak dodać urządzenie do rutera lt700 przez sieć WiFi zaznaczam że nie łączy się z Sun 2000 wyszukanie nic nie daje zgłasza błąd problemu połączenia”
Dzień dobry jak dodać urządzenie do rutera lt700 przez sieć WiFi zaznaczam że nie łączy się z Sun 2000 wyszukanie nic nie daje zgłasza błąd problemu połączenia
Drogi Łukaszu,
1. Jaki jest model Twojego urządzenia Cudy? Model można sprawdzić na etykiecie umieszczonej na spodzie urządzenia.
2. W jaki sposób podłączasz router? Czy podłączasz port WAN routera Cudy do poprzedniego urządzenia (takiego jak ONT lub modem)?
3. Jakie ustawienia wprowadziłeś w routerze?
“Witam, mam internet światłowodowy, po podłączeniu do modemu przez pppoe połączenie internetowe utrzymuje się tylko przez chwilę, po czym zanika. podłączenie drugiego routera do sieci powoduje chwilowe przywrócenie internetu, po czym dalej internet zanika. W jaki sposób mam skonfigurować poprawnie pierwszy router, aby internet cały czas działał?”